C# Json序列化时中文的字符编码 问题

【C# 序列化】Json序列化时中文的字符编码 问题

读取JSON文件

依赖 System.Text.Json
1
2
3
4
5
6
7
8
9
10
11
12
13
14
15
16
17
18
19
20
21
22
23
24
25
26
27
28
29
30
31
32
33
34
35
36
37
38
39
40
41
42
43
44
using System;
using System.IO;
using System.Text;
using System.Text.Encodings.Web;
using System.Text.Json;
using System.Text.Json.Nodes;
using System.Text.RegularExpressions;
using System.Text.Unicode;
using System.Windows.Forms;
private void data_init()
{
// 获取当前路径下的config文件夹,下面的init.json文件
configFileDirectory = Path.Combine(Environment.CurrentDirectory, "config");
configJsonFile = Path.Combine(configFileDirectory, "init.json");
//Console.WriteLine(configJsonFile);
//FileInfo fileInfo = new FileInfo(configJsonFile);
jsonString = File.ReadAllText(configJsonFile, Encoding.UTF8);
//Console.WriteLine(jsonString);
//printText(jsonString);

var document = JsonDocument.Parse(jsonString);
//var alarmTimeString = document.RootElement.GetProperty("alarmTime").GetProperty("alarmTime").GetString();
//alarmTime = Int32.Parse(alarmTimeString);
alarmTime = Int32.Parse(document.RootElement.GetProperty("alarmTime").GetProperty("alarmTime").GetString());


//var aaa = document.RootElement.GetProperty("alarmTime").GetProperty("remark").GetString();
//MessageBox.Show(aaa);
textBox1.Text = alarmTime.ToString();
}

public void updateAlarmTime() {
var jsonNode = JsonNode.Parse(jsonString);
jsonNode["alarmTime"]["alarmTime"] = alarmTime.ToString();
JsonSerializerOptions jsonSerializerOptions = new JsonSerializerOptions();
jsonSerializerOptions.WriteIndented = true;
//第一种写法
//jsonSerializerOptions.Encoder = JavaScriptEncoder.Create(UnicodeRanges.BasicLatin, UnicodeRanges.CjkUnifiedIdeographs );
//第二种写法
jsonSerializerOptions.Encoder = JavaScriptEncoder.Create(UnicodeRanges.All);
string createText = JsonSerializer.Serialize(jsonNode, jsonSerializerOptions);
//方法1
File.WriteAllText(configJsonFile, createText, Encoding.UTF8);
}

需要读写的JSON文件

1
2
3
4
5
6
{
"alarmTime": {
"alarmTime": "5000",
"name": "警报持续时间",
"remark": "单位毫秒,默认推荐5000"
}}

Electron创建新的项目

创建一个新的react app项目

创建项目脚手架资料

1
2
3
https://github.com/sindresorhus/awesome-electron

https://github.com/vitejs/awesome-vite#templates

配环境

把火绒退出,杀毒软件的锅

参考链接:https://www.cnblogs.com/makalochen/p/16154510.html
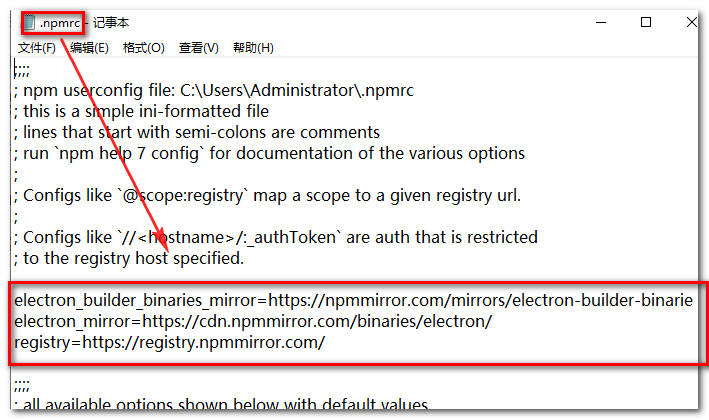
国内源的问题:

打开npm的配置文件

1
npm config edit

在空白处将下面几个配置添加上去,注意如果有原有的这几项配置,就修改

1
2
3
registry=https://registry.npmmirror.com
electron_mirror=https://cdn.npmmirror.com/binaries/electron/
electron_builder_binaries_mirror=https://npmmirror.com/mirrors/electron-builder-binaries/

image-20220416213131265

然后关闭该窗口,重启命令行,删除node_modules文件夹,并重新安装依赖

1
npm install

再次删除node_modules文件夹,并执行下面的命令清除缓存

1
npm cache clean --force

再次安装

1
npm install

MinGW-w64安装

https://shaogui.life/2021/03/10/windows上安装minGW/

1
2
3
npm rm -g create-react-app
npm install -g create-react-app
npx create-react-app my-app

add this inside package.json file before closing the “}”

1
2
3
4
5
6
,"scripts": {
"start": "react-scripts start",
"build": "react-scripts build",
"test": "react-scripts test",
"eject": "react-scripts eject"
}

Electron项目创建的三种方法

https://blog.csdn.net/weixin_40629244/article/details/115618121

  1. 克隆仓库,快速启动
  2. 克隆项目;

git clone https://github.com/electron/electron-quick-start
2. 进入这个项目下;

1
cd electron-quick-start
  1. 安装依赖;
1
npm install
  1. 运行项目;
1
npm start

打开快速启动的项目,主要有以下几个文件:

(1). index.html ,渲染进程;

(2). render.js,渲染进程,在index.html中引用;

(3). main.js,主进程;

(4). preload.js,监听DOM加载完成,在主进程中调用。

  1. 通过脚手架搭建项目
    electron-forge是一个用来搭建electron项目的脚手架,不仅可以用来运行项目,还可以用来打包项目。

官网:Getting Started - Electron Forge(https://www.electronforge.io/)

  1. 如果电脑上安装了安装了最新版本的 node 可以使用 npx 创建项目,如果安装了 yarn 也可以使用 yarn 创建项目;
1
npx create-electron-app my-new-app

或者

1
yarn create electron-app my-new-app
  1. 运行项目;
1
2
3
4
// 进入项目
cd my-new-app
// 启动项目
npm start

如果无法使用npx或是yarn安装项目,可以用传统的方法来完成。

1
2
3
4
5
6
7
8
9
10
11
// 安装脚手架
npm install -g @electron-forge/cli

// 初始化项目
electron-forge init my-new-app

// 进入项目
cd my-new-app

// 启动项目
npm start

GitHub - electron-userland/electron-forge: A complete tool for creating, publishing, and installing modern Electron applications

  1. 手动创建项目

  2. 新建项目文件夹;

  3. 新建渲染进程 index.html 文件与主进程 main.js 文件;

  4. 初始化项目,创建package.json;

1
npm init 

请注意,package.json中的主文件必须名为main.js。

  1. 在项目中安装Electron;

虽然在全局有安装Electron,但是在写代码的时候并没有提示,所以需要进入项目中安装一下,这样就会有提示了。

cnpm i electron --save-dev
5. 编写主进程main.js代码;

1
2
3
4
5
6
7
8
9
10
11
12
13
14
15
16
17
18
19
20
21
22
23
24
25
26
27
28
29
30
31
32
33
 
const { app, BrowserWindow } = require("electron");
const path = require("path");

const createWindow = ()=>{
// 创建窗口
const mainWindow = new BrowserWindow({
width: 800,
height: 600
});
// 加载本地文件
mainWindow.loadFile(path.join(__dirname,"index.html"));
// 加载远程地址
// mainWindow.loadURL('https://github.com');
}

// 监听应用的启动事件
app.on("ready",createWindow);

// 兼容MacOS系统的窗口关闭功能
app.on("window-all-closed",()=>{
// 非MacOS直接退出
if(process.platform!="darwin"){
app.quit();
}
});

// 点击MacOS底部菜单时重新启动窗口
app.on("activate",()=>{
if(BrowserWindow.getAllWindows.length==0){
createWindow();
}
})
  1. 引入eslint 检查代码;

(1). 安装eslint;

1
cnpm install -g eslint

(2). 在项目中初始化eslint;

1
eslint --init

初始化时会有各种选项,选项可以参考下面的结果。

  1. 运行项目;
1
electron .

效果如下:

img

C#项目框架选择

数据接入层

框架推荐Dapper,不推荐Entity Framework

原因:

image-20221120140851143

如果你是新手,不推荐Entity Framework,需要严格执行程序编写规范,EF连接数据库 才会有不错的性能。

更推荐Dapper框架,自己写SQL

而不是将大量的数据,尤其是多表连接数据 LEFT JOIN

如果使用LINQ,EF会一次性将数据读取到内存中,再进行过滤操作,性能有问题。

一键安装v2ray

一键安装v2ray

1.选择VPS

强烈推荐debian系统
原因:
1.无防火墙
2.我已实验过多次
3.Centos需要自己Google,如何关闭防火墙

2.远程连接VPS

推荐使用FinalShell(https://www.jb51.net/softs/717120.html)
官网:(http://www.hostbuf.com/downloads/finalshell_install.exe)

3.申请域名(或 购买域名)

免费申请域名(https://www.freenom.com/)

购买域名(https://www.namesilo.com/)

4.在cloudfalre配置域名解析(或在域名购买网站配置域名解析)

域名——————》购买的VPS IP地址

5. 本地ping 域名,得到目标IP地址

确认域名解析成功

6.一键安装v2ray

一键安装v2ray脚本

1
bash <(curl -L -s https://raw.githubusercontent.com/wulabing/V2Ray_ws-tls_bash_onekey/master/install.sh) | tee v2ray_ins.log

BBR加速代码: BBR加速:

1
wget --no-check-certificate https://github.com/teddysun/across/raw/master/bbr.sh && chmod +x bbr.sh && ./bbr.sh

如果安装不了BBR请先运行以下代码:

1
yum -y install wget

升级命令

1
2
3
sudo apt update && sudo apt upgrade
#或
apt update && apt upgrade

编程学习资料记录

快速构建静态博客

技术1. HEXO

https://hexo.io/zh-cn/

1
2
3
4
5
6
7
8
9
10
11
12
13
14
#安装依赖
npm install hexo-cli -g

#生成名称为“blog”的博客项目
hexo init blog

#进入blog文件夹
cd blog

#安装blog博客依赖
npm install

#在本地启动博客项目
hexo server

技术2. HUGO

https://gohugo.io/


编程资料

1.就业市场

中国国内程序员岗位需求:前端>后端>算法

北美:前端>后端>算法

加拿大多伦多岗位数量比例:1000前端 > 500后端 > 150 IOS = 150 安卓

其中后端:java>dot Net>其他

注:岗位需求随着市场变动

Front End Development, Back End Development, and Full Stack Developers รู้จักและทราบความหมายและหน้าที่ของ Front-end และ Back-end  ว่ามันคืออะไรและทำงานกันอย่างไร

1.1前端

Web端主要使用 Vue 和 React框架

Vue

vue(https://vuejs.org/)

React

react(https://reactjs.org/)


1.2后端

1.2.1 JAVA

后端主力,入门难度最低,使用最广。

1.2.2 dot net(.net)

中国国内后端需求不高,北美 国外有不少需求。中国国内后端java比较多,go也有一些。

1.2.3 Go

文档(https://studygolang.com/pkgdoc)

社区(https://studygolang.com/)

go语言学习视频资料:

  1. Go从入门到精通
    https://www.youtube.com/watch?v=KZlc4Fxn5qI&list=PLLPsLcbaFY20fG25TVsrCeAgXrBSrZDYU)
  2. Go语言GUI
    https://www.youtube.com/watch?v=iUFegAhBMiE&list=PLLPsLcbaFY22UYn_h2Q3DSUy27eqiptrk)

博客:https://www.liwenzhou.com/

1.2.4 Node.js

用JavaScript写后端,让前端人员能后端,不需要学习新的编程语言。


1.3 跨平台

1.3.1 桌面跨平台(MAC Win Linux)

推荐1:Electron(推荐)

https://www.electronjs.org/)

优点:使用人数最多,社区最好,bug少
缺点:性能不够好,但一定是够用的

推荐2:Tauri(一般推荐)

https://tauri.app/)

优点:使用Rust语言编写,性能好,打包文件小
缺点:需要学Rust,新学一门语言

推荐3:xamarin(一般推荐)

https://dotnet.microsoft.com/en-us/apps/xamarin)

微软收购的一家跨平台技术公司

不推荐MAUI(微软的框架)bug贼多,没人解决

1.3.2 移动端跨平台 (IOS、Android、Windows phone)

推荐1:Flutter

https://flutter.dev/)

推荐2:React Native

https://reactnative.dev/)

不推荐:vue写安卓项目

1.4 Windows编程


1.5 MAC IOS编程(不熟悉)

TODO


2. 面试

刷题网站
1.LeetCode:https://leetcode-cn.com/
2.英文网站(https://leetcode.com/)
3牛客网:(https://www.nowcoder.com
4.Web 开发练习题:(https://www.freecodecamp.org/)
5.百度前端技术学院 — 前端开发项目库:(http://ife.baidu.com

3. 文档

  1. 快速学习一门新语言(https://learnxinyminutes.com/)

这里的教程几乎涵盖所有编程语言,完全没有废话。英文版、中文版都有。学一门新语言大概耗时 30 分钟。

  1. 文档集合(https://cloud.tencent.com/developer/doc/1271)

技术文档集合,由腾讯运营

  1. 菜鸟教程(https://www.runoob.com/)

hexo常用命令

hexo

1
2
3
npm install hexo -g #安装  
npm update hexo -g #升级
hexo init #初始化

简写

1
2
3
4
5
hexo n "我的博客" == hexo new "我的博客" #新建文章
hexo p == hexo publish
hexo g == hexo generate#生成
hexo s == hexo server #启动服务预览
hexo d == hexo deploy#部署

服务器

1
2
3
4
5
6
7
8
hexo server #Hexo 会监视文件变动并自动更新,您无须重启服务器。
hexo server -s #静态模式
hexo server -p 5000 #更改端口
hexo server -i 192.168.1.1 #自定义 IP

hexo clean #清除缓存 网页正常情况下可以忽略此条命令
hexo g #生成静态网页
hexo d #开始部署

监视文件变动

1
2
hexo generate #使用 Hexo 生成静态文件快速而且简单
hexo generate --watch #监视文件变动

完成后部署

两个命令的作用是相同的

1
2
3
4
5
hexo generate --deploy
hexo deploy --generate

hexo deploy -g
hexo server -g

草稿

1
hexo publish [layout] <title>

模版

1
2
3
4
5
6
7
8
9
hexo new "postName" #新建文章
hexo new page "pageName" #新建页面
hexo generate #生成静态页面至public目录
hexo server #开启预览访问端口(默认端口4000,'ctrl + c'关闭server)
hexo deploy #将.deploy目录部署到GitHub

hexo new [layout] <title>
hexo new photo "My Gallery"
hexo new "Hello World" --lang tw
变量描述
layout描述
title标题
date文件建立日期
1
2
3
4
5
6
7
8
title: 使用Hexo搭建个人博客
layout: post
date: 2014-03-03 19:07:43
comments: true
categories: Blog
tags: [Hexo]
keywords: Hexo, Blog
description: 生命在于折腾,又把博客折腾到Hexo了。给Hexo点赞。

模版(Scaffold)

hexo new photo “My Gallery”

变量描述
layout布局
title标题
date文件建立日期

设置文章摘要

1
以上是文章摘要 <!--more--> 以下是余下全文 

写作

hexo new page

<br>hexo new post<title><p></p><table><thead><tr><th>变量</th><th>描述</th></tr></thead><tbody><tr><td>:title</td><td>标题</td></tr><tr><td>:year</td><td>建立的年份(4 位数)</td></tr><tr><td>:month</td><td>建立的月份(2 位数)</td></tr><tr><td>:i_month</td><td>建立的月份(去掉开头的零)</td></tr><tr><td>:day</td><td>建立的日期(2 位数)</td></tr><tr><td>:i_day</td><td>建立的日期(去掉开头的零)</td></tr></tbody></table><h2 id="推送到服务器上"><a class="markdownIt-Anchor" href="#推送到服务器上"></a> 推送到服务器上</h2><figure class="highlight plaintext"><table><tr><td class="gutter"><pre><span class="line">1</span><br><span class="line">2</span><br><span class="line">3</span><br></pre></td><td class="code"><pre><span class="line">hexo n #写文章</span><br><span class="line">hexo g #生成</span><br><span class="line">hexo d #部署 #可与hexo g合并为 hexo d -g</span><br></pre></td></tr></table></figure><h2 id="报错"><a class="markdownIt-Anchor" href="#报错"></a> 报错</h2><p>1.找不到git部署</p><figure class="highlight plaintext"><table><tr><td class="gutter"><pre><span class="line">1</span><br></pre></td><td class="code"><pre><span class="line">ERROR Deployer not found: git</span><br></pre></td></tr></table></figure><h2 id="解决方法"><a class="markdownIt-Anchor" href="#解决方法"></a> 解决方法</h2><p>npm install hexo-deployer-git --save</p><p>3.部署类型设置git<br>hexo 3.0 部署类型不再是github,_config.yml 中修改</p><h1 id="deployment"><a class="markdownIt-Anchor" href="#deployment"></a> Deployment</h1><h2 id="docs-httphexoiodocsdeploymenthtml"><a class="markdownIt-Anchor" href="#docs-httphexoiodocsdeploymenthtml"></a> Docs: <a target="_blank" rel="noopener" href="http://hexo.io/docs/deployment.html">http://hexo.io/docs/deployment.html</a></h2><figure class="highlight plaintext"><table><tr><td class="gutter"><pre><span class="line">1</span><br><span class="line">2</span><br><span class="line">3</span><br><span class="line">4</span><br></pre></td><td class="code"><pre><span class="line">deploy:</span><br><span class="line"> type: git</span><br><span class="line"> repository: git@***.github.com:***/***.github.io.git</span><br><span class="line"> branch: master</span><br></pre></td></tr></table></figure><ol start="4"><li>xcodebuild<br>xcode-select: error: tool ‘xcodebuild’ requires Xcode, but active developer directory ‘/Library/Developer/CommandLineTools’ is a command line tools instance</li></ol><p>npm install bcrypt</p><ol start="5"><li>RSS不显示</li></ol><p>安装RSS插件</p><figure class="highlight plaintext"><table><tr><td class="gutter"><pre><span class="line">1</span><br></pre></td><td class="code"><pre><span class="line">npm install hexo-generator-feed --save</span><br></pre></td></tr></table></figure><h3 id="开启rss功能"><a class="markdownIt-Anchor" href="#开启rss功能"></a> 开启RSS功能</h3><p>编辑hexo/_config.yml,添加如下代码:</p><p>rss: /atom.xml #rss地址 默认即可</p><h2 id="开启评论"><a class="markdownIt-Anchor" href="#开启评论"></a> 开启评论</h2><p>1.我使用多说代替自带的评论,在多说 网站注册 > 后台管理 > 添加新站点 > 工具 === 复制通用代码 里面有 short_name</p><ol><li><p>在根目录 _config.yml 添加一行 disqus_shortname: jslite 是在多说注册时产生的</p></li><li><p>复制到 themes\landscape\layout_partial\article.ejs<br>把</p></li></ol><figure class="highlight plaintext"><table><tr><td class="gutter"><pre><span class="line">1</span><br><span class="line">2</span><br><span class="line">3</span><br><span class="line">4</span><br><span class="line">5</span><br><span class="line">6</span><br><span class="line">7</span><br><span class="line">8</span><br></pre></td><td class="code"><pre><span class="line"><% if (!index && post.comments && config.disqus_shortname){ %></span><br><span class="line"><section id="comments"></span><br><span class="line"><div id="disqus_thread"></span><br><span class="line"> <noscript>Please enable JavaScript to view the <a href="//disqus.com/?ref_noscript">comments powered by Disqus.</a></noscript></span><br><span class="line"></div></span><br><span class="line"></section></span><br><span class="line"></span><br><span class="line"><% } %></span><br></pre></td></tr></table></figure><p>改为</p><figure class="highlight plaintext"><table><tr><td class="gutter"><pre><span class="line">1</span><br><span class="line">2</span><br><span class="line">3</span><br><span class="line">4</span><br><span class="line">5</span><br><span class="line">6</span><br><span class="line">7</span><br><span class="line">8</span><br><span class="line">9</span><br><span class="line">10</span><br><span class="line">11</span><br><span class="line">12</span><br><span class="line">13</span><br><span class="line">14</span><br><span class="line">15</span><br><span class="line">16</span><br><span class="line">17</span><br><span class="line">18</span><br><span class="line">19</span><br><span class="line">20</span><br></pre></td><td class="code"><pre><span class="line"><% if (!index && post.comments && config.disqus_shortname){ %></span><br><span class="line"> <section id="comments"></span><br><span class="line"> <!-- 多说评论框 start --></span><br><span class="line"> <div class="ds-thread" data-thread-key="<%= post.layout %>-<%= post.slug %>" data-title="<%= post.title %>" data-url="<%= page.permalink %>"></div></span><br><span class="line"> <!-- 多说评论框 end --></span><br><span class="line"> <!-- 多说公共JS代码 start (一个网页只需插入一次) --></span><br><span class="line"> <script type="text/javascript"></span><br><span class="line"> var duoshuoQuery = {short_name:'<%= config.disqus_shortname %>'};</span><br><span class="line"> (function() {</span><br><span class="line"> var ds = document.createElement('script');</span><br><span class="line"> ds.type = 'text/javascript';ds.async = true;</span><br><span class="line"> ds.src = (document.location.protocol == 'https:' ? 'https:' : 'http:') + '//static.duoshuo.com/embed.js';</span><br><span class="line"> ds.charset = 'UTF-8';</span><br><span class="line"> (document.getElementsByTagName('head')[0] </span><br><span class="line"> || document.getElementsByTagName('body')[0]).appendChild(ds);</span><br><span class="line"> })();</span><br><span class="line"> </script></span><br><span class="line"> <!-- 多说公共JS代码 end --></span><br><span class="line"> </section></span><br><span class="line"><% } %></span><br></pre></td></tr></table></figure>